Winches Part 2: Fitting a Winch
There are three options available to you to fit a Winch depending on your skill and budget involved. This article brushes across the first two options, as this is primarily a guide for doing it yourself. This is the second of our three part series on winches. Read the first part, how to choose a Winch or read the final chapter, how to use a Winch.
Pay to get it fitted
Naturally, this is the easiest option. There are a number of companies around that will fit winches to your Land Rover, and i'm sure you can find them if you need them...
Buy a Winch bumper
The second option is a ready made winch bumper: there are a wide range available for most Land Rovers. They can be fitted by any competent mechanic or experienced DIY enthusiast, as they bolt on in place of the original bumper, and you connect the winch leads to the battery. It is best to put an isolator switch between the battery and the winch on the positive lead, so that when you are not using the winch you can keep it isolated to avoid any power loss through an accidental short circuit.
Fit your own Winch
For this you will need access to engineering equipment welder, drill, cutting gear and the like.
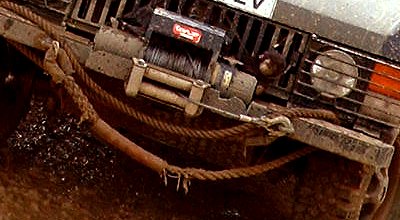
When fitting a winch, the location is very important. A winch needs to be on top of or between the chassis rails, as far back as possible, so that you do not interfere with the approach angle of your vehicle. The approach angle is the angle between the front of the vehicle, the front of the tyres and the ground. The steeper the angle, the better your angle of approach to an obstacle. When fitting a winch down low or hiding it away is likely to cause problems later on when you need to use it.
It could be that the first time you need it the front of your vehicle will be nose down in a ditch and you wont be able to get to it, it will be clogged up with mud or under water. In theory your cable should be neat and tidy on the drum and should never cross over itself or bunch up at one end. That's fine in the classroom but out in the field it is hard to do if you can't see the winch clearly. When the cable does become uneven, as it will, you need clear easy access to your winch to clear any problem.
Your winch should be fitted so that the line of pull runs down the centre of the chassis, distributing the stress evenly through the vehicle. A steel channel slightly wider than your winch will be needed. There is a sheet of paper with our winches giving you the footprint of the winch, setting out the winch bolt holes. The rear of the of the steel channel doesn't need to be more than 25 or 30mm. The front should be high enough to mount your roller fairlead to, with a gap cut into it the width of the rollers for your cable to pass through. The bottom of the top roller should be parallel with the bottom of the winch drum with no cable on it, so as the drum fills up it will expand towards the bottom roller. 4 or 5mm steel is quite adequate for your channel.
You will then need to fabricate brackets to mount the channel to the chassis: just mounting it to the original bumper mounts is not enough as these mounting holes are not designed to take the strain of a winch by themselves. I have seen the front of a chassis ripped out by the strength of a winch. You need to add extra mounting points spreading the load evenly across the chassis. The bolts you use should also be high tensile steel as used in the automotive industry, not the low grade stuff you get from a builders merchant.
Any welding should be done by a experienced welder as a winch puts huge strain on the vehicle and your mounting is only as strong as the weakest point. If in doubt, ask for advice and look how other people have done theirs, especially the professionally manufactured ones. These have been designed by experts who know where the weak points are and how to strengthen them without adding so much weight that you need stronger suspension.
Read more in part 1 about choosing your Winch or learn how to use your Winch in part 3.
Related Articles
There is a good Winch fitting article at Discovery2.