Fitting rear lower link bushes and polybushes
Bushes wear out. Fact. And on expedition they get a hammering. In Belize, the number one most frequent job would be replacing bushes somewhere on the vehicle. Some would only last 6 months. In the environment where you're driving on rough roads, the suspension takes the most punishment and the bushes are the only bit of "give" between the hard bits of metal.
In any long expedition you may find yourself having to replace the bushes throughout. At the worst, they can cause poor handling and damage to the chassis. The rear lower link (or sway bar) bushes will regularly go. You can tell when the lower link to chassis bush has failed because you get "rear wheel steering", which you feel when you change gear. Due to the slight deceleration and the play in the joint, the rear axle pivots on one side and then clunks back as to accelerate. This can have the unnerving effect of either steering you into a ditch or oncoming traffic depending on which side it is. It's always good to replace bushes as soon as they are on their way and to fit reputable quality brands.
I replaced my lower link bushes as they were pretty old with not much flex. I decided to fit polybushes to the axle end. Changing these with standard bushes requires access to a several ton press. I have elected for polybushes so that they may more easily be maintained in the field with simple tools, however there is a debate over polybushes vs genuine. The process below of removing the original metalastic bush without a press is a pain, comprising a vice, hacksaw and hammer, so doing it now will mean the less I have to do it on expedition!
Watch the rear bushes at work just on a country lane:
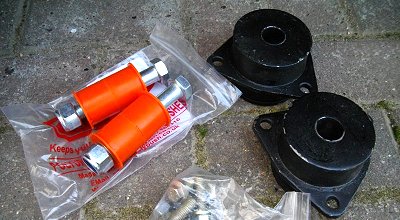
What you'll need
- Lower link to Chassis bush x 2 - NTC9027
- Lower link to Axle bush x 2 - NTC1772
- M20 Nyloc nut x 2
- M10 x 30mm bolts x 6
- M10 Nyloc nuts x 6
- 30mm, 24mm, 15mm sockets/spanners
- Copper grease
- Hammer
- Hacksaw
- Vice
- Drill
What to do
Lay out your lovely shiny new bits in anticipation of making an improvement to the ghastly site attached to your vehicle

Undo the big Nyloc nut with a 30mm socket and breaker bar. Do this end first as the axle end stops the arm from rotating. This nut was on friggin tight and took some muscle. Also undo the three 15mm bolts/nuts holding the bush to the chassis. The bolt may be flange headed, in which case it would be 13mm. Because of their location, you can't really cut them off, so hard work with socket a spanner saves the day.


The axle end has a long bolt and nut, 24mm and are also tight. I used a socket, breaker bar and an adjustable hammer wedged against the axle. The bolt may be hard to remove once tapped flush from the nut side, so clamp the spanner (or mole grips) under the head of the bolt and tap the spanner to pull the bolt out.


Lever the arm down and pull it out of the chassis bush. Now we need to get the bush out of the axle end of the arm - the time consuming bit!


Drill around the rubber parts of the bush and start hammering it through bit by bit. Put it in a vice and slowly keep pushing it through. Drill some more. Keep going until the bush finally pops out. (The other, less environmentally sensitive way is to burn it out).


Once the rubber part is out you can turn your attention to the outer sleeve of the bush that's wedged firmly in the arm. Clamp the arm in a vice and hacksaw through the sleeve as close as you can get without damaging the arm. Once it's cut all the way thorugh, start to lever the edge of the sleeve away from the bush. If you're lucky you can lever the whole sleeve on one side and curl it up into the middle.


Otherwise, you will be able to lever the sleeve inwards as far down as you can go, and then press the sleeve out with a vice now that the friction has been reduced.


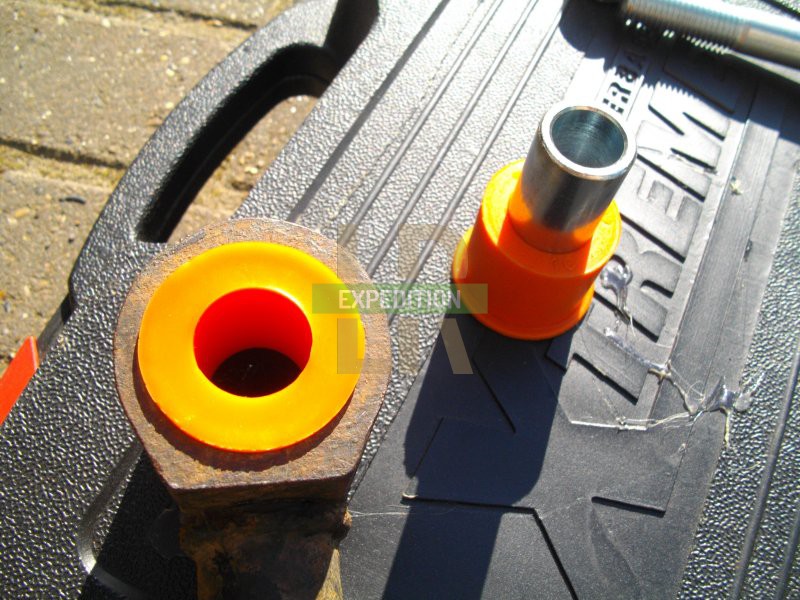
If you were using normal metalastic bushes, this is where you would have to press them back in. In the case of polybushes, you need to place the polyurethane part into the arm and then the metal inner sleeve. The Polybush branded bushes come in two halves, and tend not to want to sit completely together the last little bit and sit a bit proud. SuperPro bushes are manufactured as a single bush and are pressed in from one side, and therefore have the right amount of protrusion.

Once the bushes are fitted to the arm, fit the new chassis bush to the chassis and loosely tighten the three bolts/nuts

Slide the arm into the chassis bush and then offer it up to the axle bracket. Seeing as the polybushes were wider than before, I had to prise apart the bracket slightly. It took a bit of effort but finally I could get the bolt back through the bush. Tighten the axle bolt to 176Nm. The way the bushes have ended up is looking like they're slightly bulging.


Tighten up the three bolts holding the chassis bush to the chassis and then the main 30mm nyloc nut to 176Nm. Use lots of copper grease for the next time it all comes apart!


The handling of the vehicle now feels a lot better. It's a less jarring experience going over bumps and potholes. Time will tell as to how effective the polybushes are, but if they had to be replaced again i'd feel a lot better about it knowing that I wouldn't have to hacksaw, hammer and press my way for a couple of hours to remove the existing bush.
Oh, and don't forget to do the other side!