Assembling the Td5 rear door
Having cleaned the door down and sent it off to the body shop, it came back gleaming in Chawton White for the cost of £100. Putting the door back together is mostly straightforward, especially if you have already disassembled it, although putting the glass can be a little tricky.
Tools
- T25 Torx bit/screwdriver
- 10mm spanner
- 13mm spanner
- String or paracord
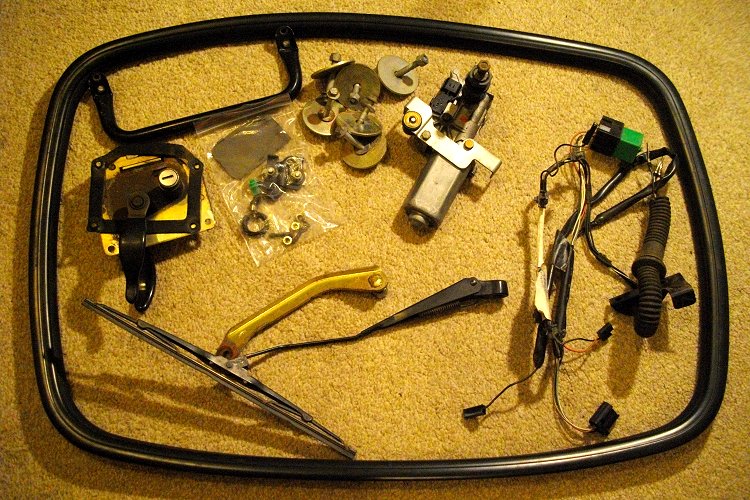
Parts
If you are starting from scratch, you will need the following pieces:
- One piece rear door skin - BIC710250
- Window glass - CQB000150 (Heated, not stop light), CQB000270 (Heated, with stop light), CQB000140 (non-heated)
- Rubber glass seal - CVW500010
- Six M8 x 50mm Flange head bolts with nyloc nuts and penny washers - VYG000020
- Six Large flat washers - 566580
- Door lock - FQJ000220PMA or FQM000030 (central locking)
- Lock barrel grommet - EKC000030PMA
- Wiper motor - AMR3676
- 2 Wiper spindle grommets - AMR3932
- 1 Wiper spindle washer - AMR3933
- 1 Plastic wiper spindle nut - AMR3934
- 1 M8 Nyloc Nut
- Wiper to door bolt - GG106251L
- Wiper arm - DKB000370PMD
- 8 trim clips - EKM100100L
- Door trim - ESN000200LOY
- Door grab handle - EST000010PMA
- 4 x grab handle screws - DYP101480
- Wiring loom - YMN000023
- Torsion bar - MXC1790
- Two bolt studded plate - MUC1961
- 2 x M6 nyloc nut
- Torsion bar bracket - MWC6450
- Check strap - BHQ710020
Make sure you have them all by laying them out.


Glass screen
Fit the rubber seal to the glass (broader side to the outside) and run a length of paracord or other low friction string into the inner groove. Halfway round, create a large loop before continuing around the rest of the seal. You should have a loop on one short side and the two ends poking from the other.


If you can get someone to help you with the next bit it would be helpful, but I managed on my own (eventually). Place the glass and seal up to the door on the outside, and place the loops inside (unlike the picture!). Whilst applying medium pressure to the glass edge, start to pull the cord perpendicular to the seal and frame. I emphasise pulling perpendicularly as pulling in the direction of travel is will not help.
Work your way round the window. Sometimes the seal might not seat properly, but eventually you'll get there.

Wiper motor
Place the two grommets in the wiper spindle hole on the door and place the spindle through the door. Tighten the 10mm bolt, but not too tight, and hand tighten the washer and plastic nut on the outside.


Door lock
Place the door lock gasket and then fit the lock with the 4 x 10mm nuts. Put the plastic grommet back into the lock barrel hole.

Check strap
Put the studded plate into the slot on the door and line up the torsion bar with the plastic end facing down. Plate the bracket over the top with the washers and nuts.


Wiring loom
Connect the wiring loom onto the wiper motor and push the clips through the holes in the door. Connect the heated window elements. Clip the relay onto the door.

Spare wheel mount bolts
The large metal washers that hold the bolts to the inside of the door had bowed, as they sit proud of the hole in the back of the door and are drawn out of shape upon tightening. I placed a small washer inbetween to remove the gap and help spread the load more evenly. I also replaced the existing bolts with Stainless steel ones for cosmetics. If putting a spare wheel carrier on then I would use the original steel bolts as these are stronger than stainless.


Wiper arm
Place the wiper arm on the spindle and line the splines up until the wiper blade is horizontal. Put the 13mm nyloc nut on the end and tighten.

Trim clips
Trim clips on Land Rovers inevitably break and I only had one working one left. The genuine LR clips (EKM100100L) retail at over £1 each, so I managed to find some almost indentical clips for BMWs. They are part number: ACD5820 (eBay link). The clips just slot into the reverse of the door trim.
LR Expedition may receive compensation for purchases made using the eBay links.
, BMW clip right (ACD5820)")

At this point I will fit the door to the vehicle, sort out the wiring and then fit the door trim and grab handle last.