Fitting a new rear door
Having assembled the door, it was now ready to fit. It's a bulky job at times and lining up the door can be a pain but naturally is the most satisfying aspect of this work. The newer Td5 rear door is geometrically the same as the older door, so will fit fine with the same hinge bolt and lock striker locations.
I'd also bought some stainless steel hinge bolts that I could replace the rusting originals with at the same time.
What you'll need
- One, or ideally, two other people
- 13mm spanner (hinge nuts)
- T25 torx bit (for new bolts)
- Phillps screwdriver (for lock striker)
- 10mm spanner (for checkstrap pivot nut)
Fitting new hinge bolts
If you are replacing the bolts at the same time as this procedure, do the body held bolts first so that the existing door keeps them in place. Do a hinge at a time, releasing the nuts and replacing the bolts. There are 5 nuts, two on each top and bottom hinge, and one on the middle.

One of the middle bolts is held by a captive plate with a single welded nut. The bottom hinge to body nuts are located in the wheel arch under the rubber flap. They will probably be extremely rusted and need to be drilled out.


Replacing the door
Open the door, disconnect the wiring loom and remove the trim from around the quarter window. I found it easier to have the door open as it was removed as I had two people to hold it and it was easier to reach the bolt and nut from either side. The alternative is to keep the door closed to hold the weight and have one person inside and one out.


Undo each of the nuts in turn. There are 6. You can't reach the middle hinge bolts and nuts as one person, so use the other person on the other side of the door and work in unison. Tap the bolts out with a hammer and brace the weight of the door as it releases.
Offer up the new door and bolts, then broadly tighten them all to hold it firmly. Don't forget to put the loom bracket back on the middle hinge before you tighen the nuts.


Push the door closed with one person inside and one person out, then loosen all the nuts. Manipulate the door until it fits flush and square all the way round, and then start tightening them back up again with your buddy inside.
Once done, open the door and give it its first slam! It probably won't close properly and require a bit more tweaking of the hinges and striker. Keep going until you're satisfied, firm in the knowledge that it is supposed to fit!
Put the checkstrap back on the door and check that the bottom hinge bolt doesn't foul the pivoting bolt when closed. Mine came close as the stainless bolts were longer than the originals.


Regarding the lock, the later doors use the longer barrel meant for the ignition key, as opposed to the older short barrels. I was expecting to have to replace it but found that it worked well with my ignition key. Not sure if that's a good thing or a bad thing...(!)
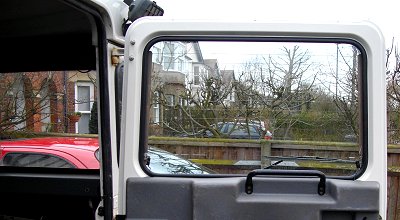
The door is now fitted and looking the business. All that's left is to connect the wiring loom and put on the door card by pushing in the 8 clips fitted when the door was assembled.

